The idea with CM

CM is an special interface to your Google Calendar. You can chose between two ways of displaying your events: standard style and schedule style. As with Google’s interface you can display events belonging to many different calendars in the same view. The standard way of displaying events means that events will be colored according to which calender the event belongs to. For example, you may want to have a calendar devoted to private things and another calendar devoted to things having to do with work. Events belonging to those two different calendars will then be displayed with different colors, like this… Calendar.Business.all or like this…Calendar.Private.All 
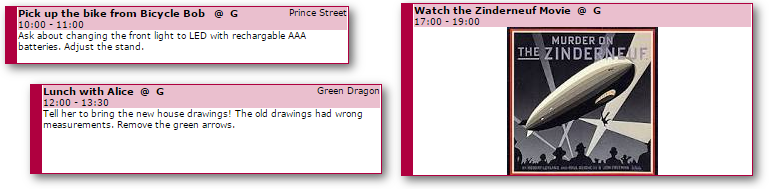
But there’s also the so called schedule style. In the schedule style an event’s color is determined by the header text (also called the summary). So events belonging to the same calender will be displayed with different colors depending on the text in the header. All nine of the events below belong to the same calendar… Calendar.School.schedule.style 
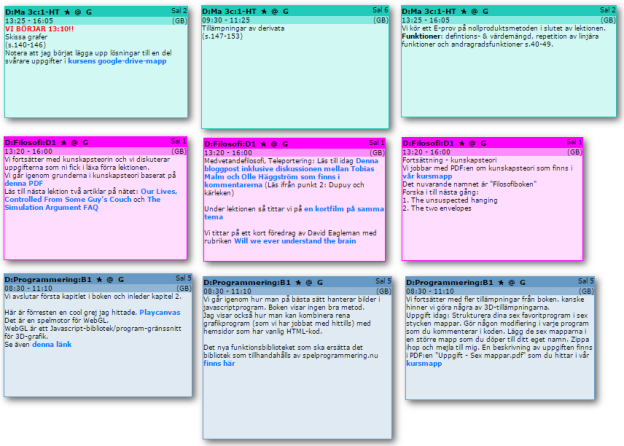
If you use the schedule style you have access to one important feature. If you click on the little star symbol ★ after the header, you will open up a “whole series view” where all events having the same identical header will be displayed side by side. Like this… Calendar.Semesterplan Teachers can use this interface to plan a complete course or students can use it to get an overview. Another important feature is that CM also displays the event’s descriptions – not just the header (which is the only thing being displayed in Google’s standard interface). These descriptions can contain some basic formatting, images and most important – clickable links with arbitrary link text. Event.instructions

The descriptions of events are very easily edited by just writing in the box (finishing by pressing tab) but being focused on display there is no way of creating new events in CM. Use your standard Google interface for creating new events.

Getting CM Calendar to connect to the right email account

There is no longer a menu where you can select which email account you want CM Calendar to connect to. CM Calendar will automatically connect to your Chrome browser’s primary gmail account.

If you (like me) uses two different email accounts, one for work and one for private things I strongly recommend you to create a two user setup in Chrome. It’s super convenient.

Just open the Chrome Settings page Chrome Settings and below the header “People”
click on “Add person…” add_person

You can specify an alternative primary email account by logging in to Chrome

my_other_account

Now you are set to go.

You switch between your users really easy by clicking on the small user icon up in the top left corner.

chroem_user_icon

You will have to install CM Calendar again for your new user by visiting the Chrome Web Store

CM Calendar in Google Chrome Web Store

Click on the blue “free”-button to install CM Calender as a Chrome Extension
install_free

That’s it!

Some other things that you probably want to do with your new Chrome user

Getting your bookmarks

Among your first priorities with your new Chrome user are probably to import your bookmarks from your original user.

1) Switch back to your original user and go to the “Bookmarks Manager”
Chrome Settings Chrome Settings > Bookmarks > Bookmarks Manager

2) In the drop down menu “Organize” chose “Export bookmarks to HTML file…”export_bookmarks
Save them for example to your desktop

3) Switch to your new Chrome User and go to the “Bookmarks Manager”
Chrome Settings Chrome Settings > Bookmarks > Bookmarks Manager

4)  In the drop down menu “Organize” chose “Import bookmarks from HTML file…”
import_bookmarks
Find your saved bookmarks file and you’re done!

Getting more appropriate Chrome user icons

If you’re not happy with the default selection of Chrome user icons that are displayed in the top left corner to signify the identity of the current user ther’s a way to use your gmail account images instead.

1) Navigate to the experimental “Chrome Flags” settings page by typing the following address in your browsers address field

chrome://flags/#enable-google-profile-info

2) At the top of your browser page you’ll see…
enable_user_profile_info

click on “Enable”.

The next time you start Chrome, Chrome will be using your Gmail account images to indicate the current Chrome user.

Some final remarks on how having a two user set up in Chrome will make your life easier

Two bookmarks bars means more space and better organization

If you take away your job related bookmarks from your private user’s bookmarks bar and vice versa from your job user’s bookmarks bar you free up space and adapt them according to your different needs.

Two Chrome users means that you can switch super easy between for example two facebook accounts

Some people uses a private Facebook account and an alternative account representing themselves in their profession. A multi user Chrome setup makes switching between multiple Facebook accounts a piece of cake.


Formatting text

If you access your google calendars through CM you’ve got four special text formating options available for your events descriptions (not for the headers).

1. Using arbitrary text as web links.

If you input

I suggest you read this New York Times article” [http:// www. nytimes. com/2007/08/14/science/14tier.html]

it will be displayed in CM as

I suggest you read this New York Times article

The text within double quotes will become a clickable web link if followed by a web address within square brackets.

2. Using small icons

If you input

“icon” [http:// upload.wikimedia.org/wikipedia/commons/thumb/8/85/Smiley.svg/200px-Smiley.svg.png]

that will be displayed in CM as

smiley

The keyword “icon” within double quotes follwed by the web address within square brackets of an image will show that image.

3. Bold text

If you input

It is very _important_ that you drink water.

that will be displayed in CM as

It is very important that you drink water.

Text written inbetween underscore characters will be shown as bold.

If you want several consecutive words in bold face you just insert underscore characters inbetween them like this:

It is _very_important_ that you drink water.

it will be displayed in CM as

It is very important that you drink water.

4. Bold red text

If you input

It is very _important!_ that you drink water.

that will be displayed in CM as

It is very important that you drink water.

Text ending with an exclamation mark and written inbetween underscore characters and will be shown in bold red.

If you want several consecutive words in red bold face you end the last word with an exclamation mark and you insert underscore characters inbetween them like this:

It is _very_important!_ that you drink water.

it will be displayed in CM as

It is very important that you drink water.

That’s all. You’re most welcome with other ideas of improving the CM interface. Keep in mind that it’s not very practical if the special formatting syntax makes the text hard to comprehend when viewed through Google Calendars default interface. That’s one of the important reasons why ordinary HTML-code can’t be used. An event description filled with HTML tags won’t look very nice when viewed via the standard Google interface.